


How to create system recovery backup and execute system recovery through MSI Center / Dragon Center / Creator Center / MSI Center Pro?
MSI recommends every user create system recovery disk first; recovery backup can help you recover the system in most cases.
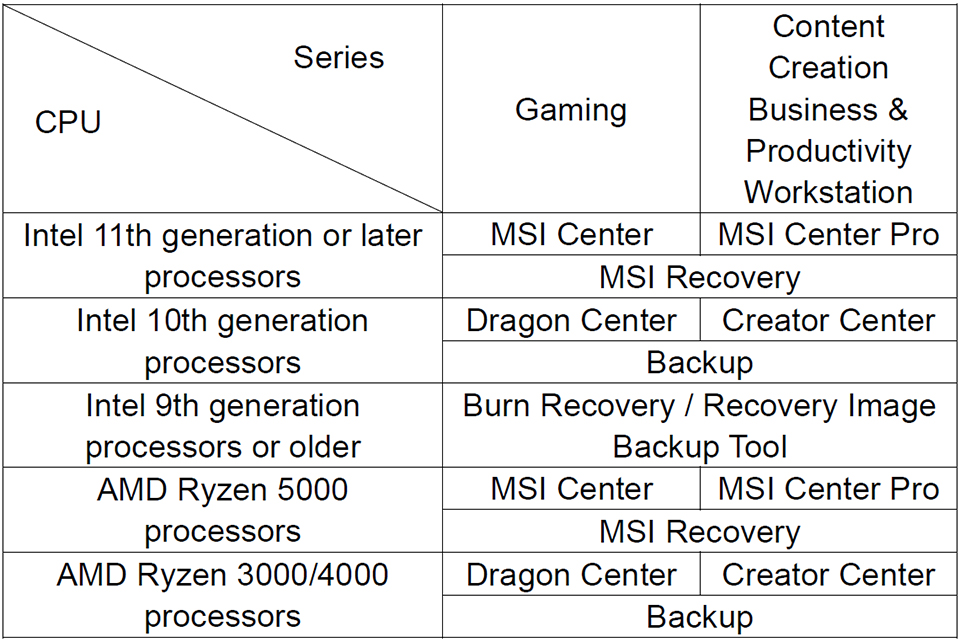
Please select the corresponding Center software to perform system backup according to the CPU configured for your computer. If your computer only supports system backup through Burn Recovery / Recovery Image Backup, please refer to How to use MSI Burnrecovery?
MSI Center Pro
For notebook computers with the Windows system preinstalled, MSI Center Pro provided the “System Restoration” and “MSI Recovery” options to allow users to create system restore points or system backup drives; the following are the differences between “System Restoration” and “MSI Recovery”.
- System Restoration
Create a system restore point while the system is still operating normally; if the system encounters any problems, the system can be restored to the restore point previously created, and keep all files and settings in the restore point. - MSI Recovery (only applicable to notebook computers with the Windows system preinstalled)
- MSI Image Backup: Creates a MSI Image Restore disk; when the system restoration disk is used to restore the system, all files and settings will be removed and the system will be restored to its default factory settings.
- Customize Image Backup: Saves the customized system backup file to an external hard drive; when the customized backup file is used to restore the system, the system will be restored to the status of the customized system backup, and all files and settings will be kept.
- Creating a system restore point
- Restoring the system to past restore points
- Creating a system restoration disk
- Restoring the system using the system restoration disk
Creating a system restore point
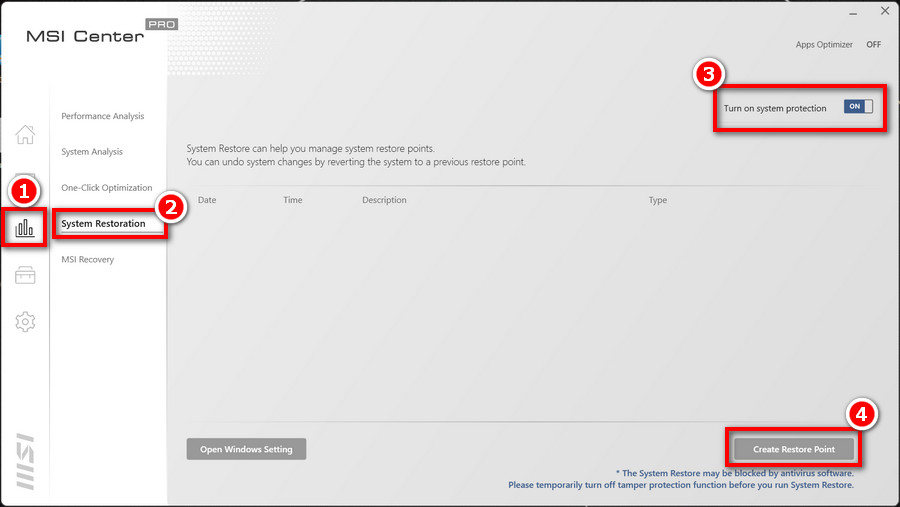
1. Open MSI Center Pro → System Diagnosis
2. Open System Restoration
3. Enable “Turn on system protection”
4. Click “Create Restore Point”
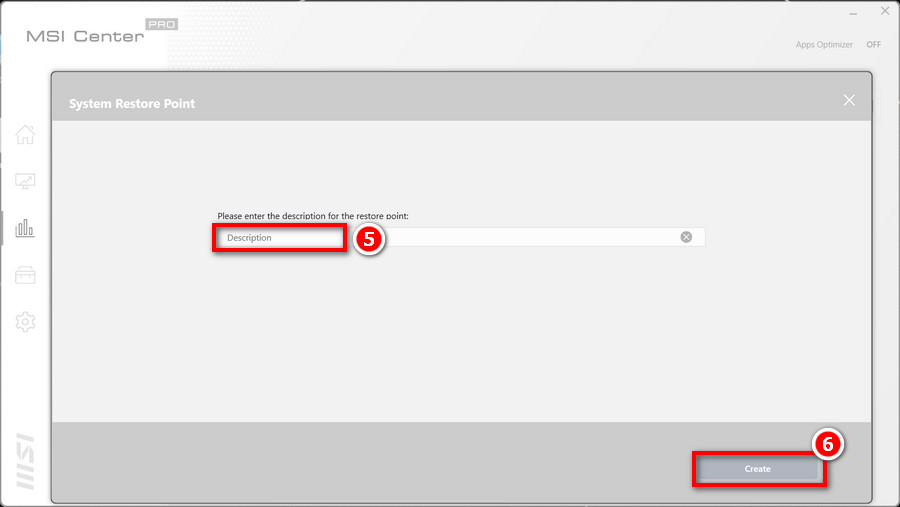
5. Enter the description for the restore points
6. Click the “Create” button”
Note: It is recommended to create system restore points regularly because most of the latest Windows versions might not allow the system to return to old Windows versions; if you try to return to a system restore point that was created too long ago, system restoration may fail.
Restoring the system to past restore points
1. Click the restore icon after the system restore point is created
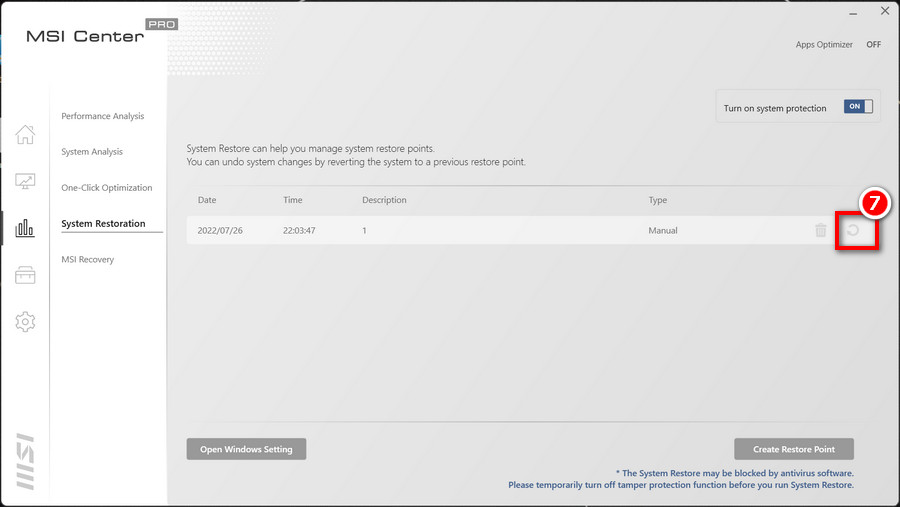
2. Click the “Restore” button again to restore the system to the specified restore point

Creating a system restoration disk
Before executing:
- Use a USB flash drive that is 32GB or larger to create your restoration flash drive.
- During the system restoration process, please keep the power cable connected at all times.
- Do not move or delete any system files or clear the system drive.
- Please read this article thoroughly before starting the backup.
MSI Image Backup
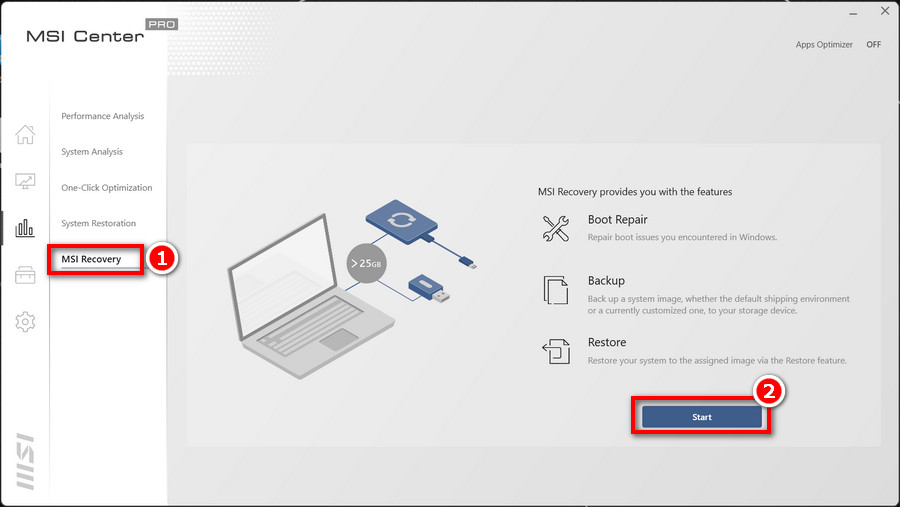
1. Enter MSI Center Pro → System Diagnosis → MSI Recovery
2. Click “Start”

3. Click “Yes” to restart the system and enter WinPE mode

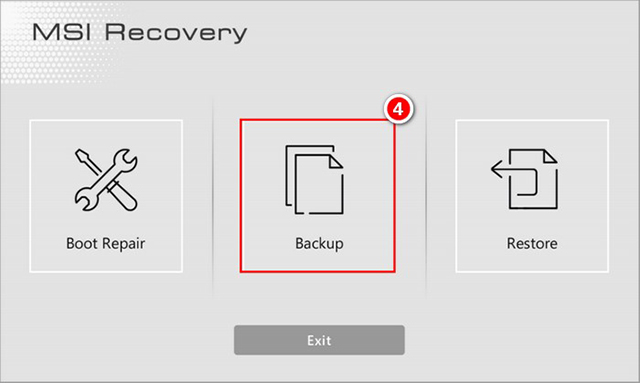
4. Insert a USB flash drive with sufficient space and select “Backup” from the WinPE menu
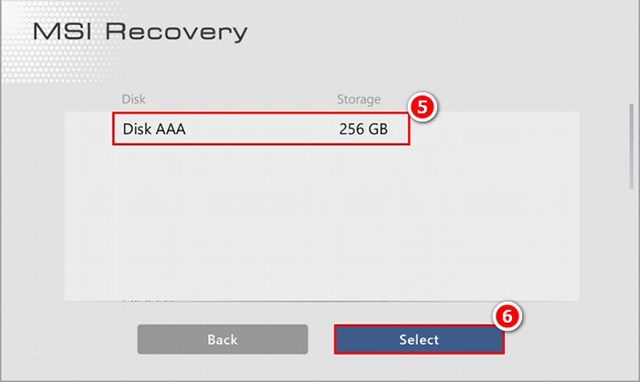
5. Select the path of the inserted USB flash drive
6. Select “Select”
7. Click “Yes” to format the flash drive and continue.

8. MSI Image Restore disk (MSI Image Backup) completed

Customize Image Backup
Before executing:
- Prepare a MSI Image Restore disk
- Prepare a USB flash drive with 64GB or more
- During the system restoration process, please keep the power cable connected at all times
1. Enter MSI Center Pro → System Diagnosis → MSI Recovery
2. Click “Start”
3. Click “Yes” to restart the system and enter WinPE mode

4. Insert the MSI Image Backup disk and a USB flash drive with sufficient capacity, and then select “Backup” in the WinPE menu

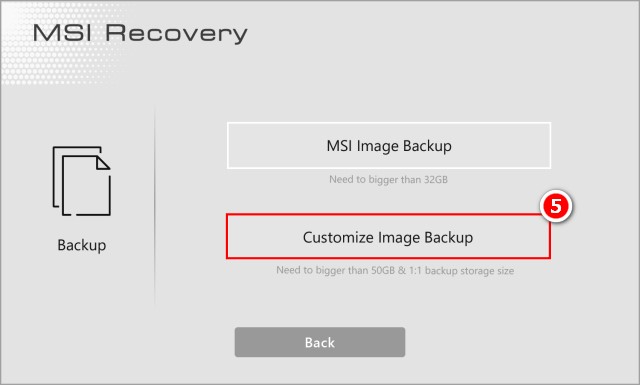
5. Select “Customize Image Backup”
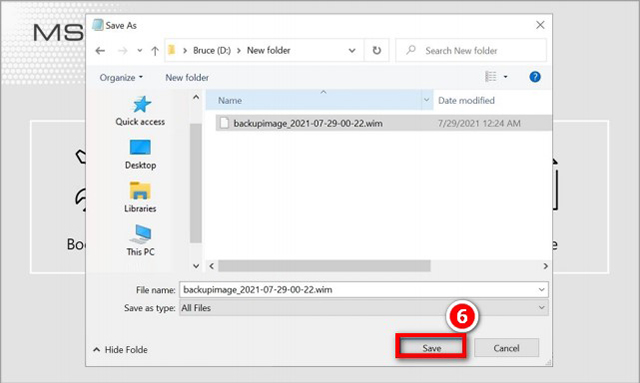
6. Save the customized image backup file (.wim) at the designated path
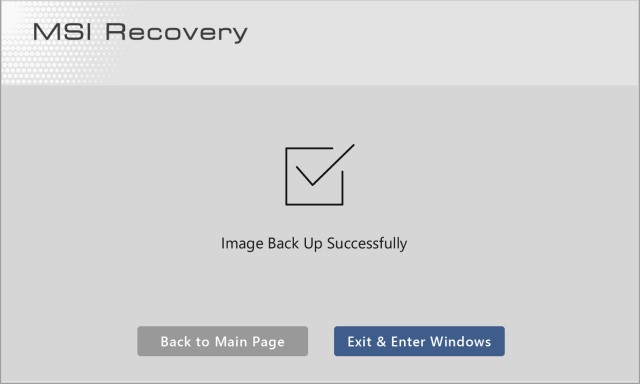
7. Customize Image Backup created successfully
Restoring the system using the system restoration disk
MSI Image Restore
Before executing:
- Prepare a MSI Image Restore disk
- During the system restoration process, please keep the power cable connected at all times
1. Insert the MSI Image Restore disk into the computer.
2. Restart the computer.
3. Press the “F11” hotkey during the computer’s restarting process
4. Select boot from “USB flash drive” and then press “Enter” to confirm and enter the WinPE menu
5. Select “Restore” in the WinPE menu
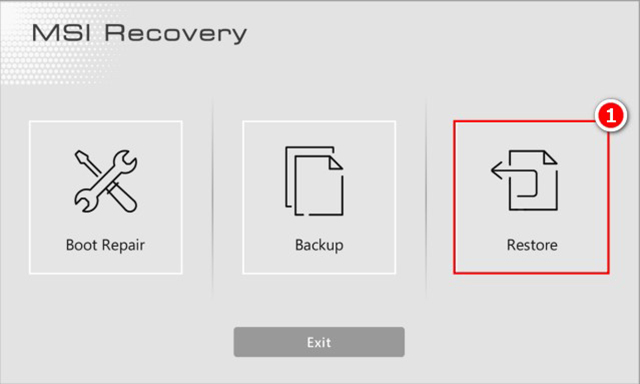
Note: MSI Image Restore will restore the notebook to its default factory settings and will not save any system changes.
6. Select “MSI Image Restore”
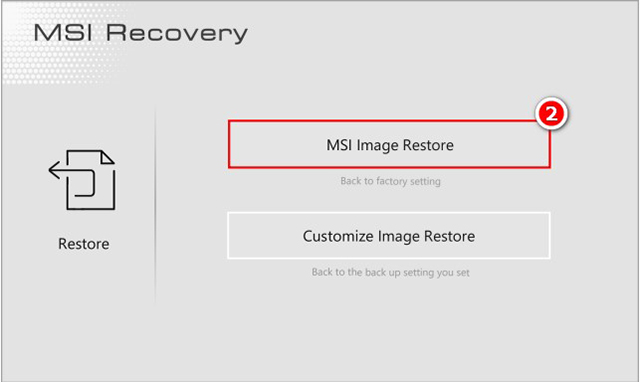
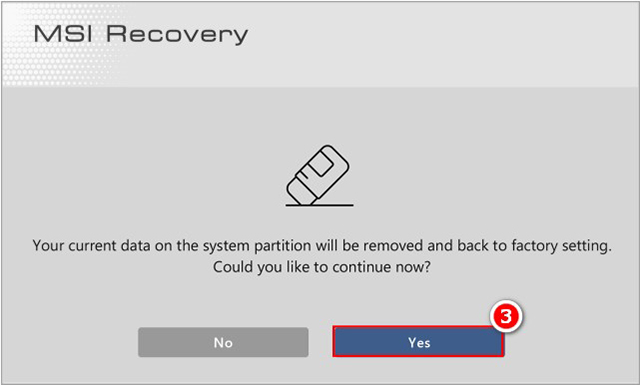
7. Select “Yes”, the system restoration operation will reformat the hard disk; make sure to backup the important data before executing the next step
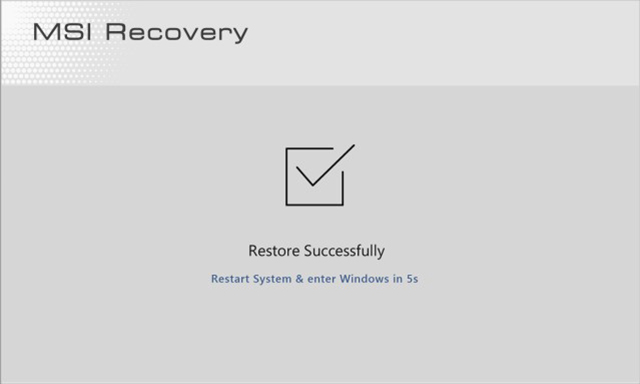
8. When the system restoration operation is completed, the system will restart automatically
Customize Image Restore
Before executing:
- Prepare a MSI Image Restore disk (MSI Image Backup)
- Prepare the Custom Image Backup file (Customize Image Backup)
- During the system restoration process, please keep the power cable connected at all times
1. Insert the MSI Image Restore disk into the computer.
2. Restart the computer.
3. Press the “F11” hotkey during the computer’s restarting process
4. Select boot from “USB flash drive” and then press “Enter” to confirm and enter the WinPE menu
5. Insert the flash drive with the Customize Image Backup file into the computer, and select “Restore” in the WinPE menu

6. Select “Customize Image Restore”
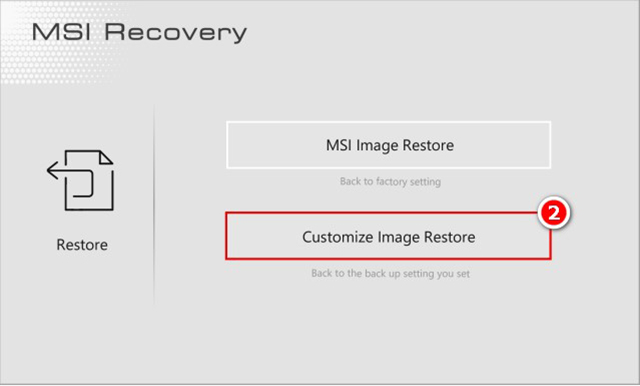
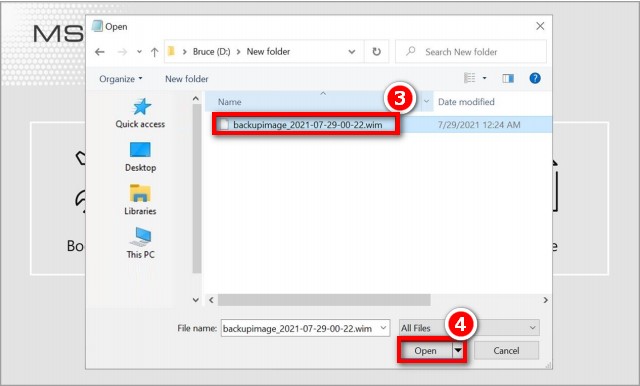
7. After selecting the Custom Image Backup file, click “Open”.
8. Select “Yes”, the system restoration operation will reformat the hard disk; make sure to back up the important data before executing the next step

9. When the system restoration operation is completed, the system will restart automatically

MSI Center/ MSI Dragon Center/ MSI Creator Center
If your computer support creating system restoration disk and executing system restoration through the genuine system restoration function in MSI Center/ MSI Dragon Center/ MSI Creator Center, please refer to below steps.
Note: The recovery steps of MSI center and MSI Dragon Center/ MSI Creator Center are the same. And the location and naming of tool are different, please refer to below steps to find the recovery tool.
MSI Center
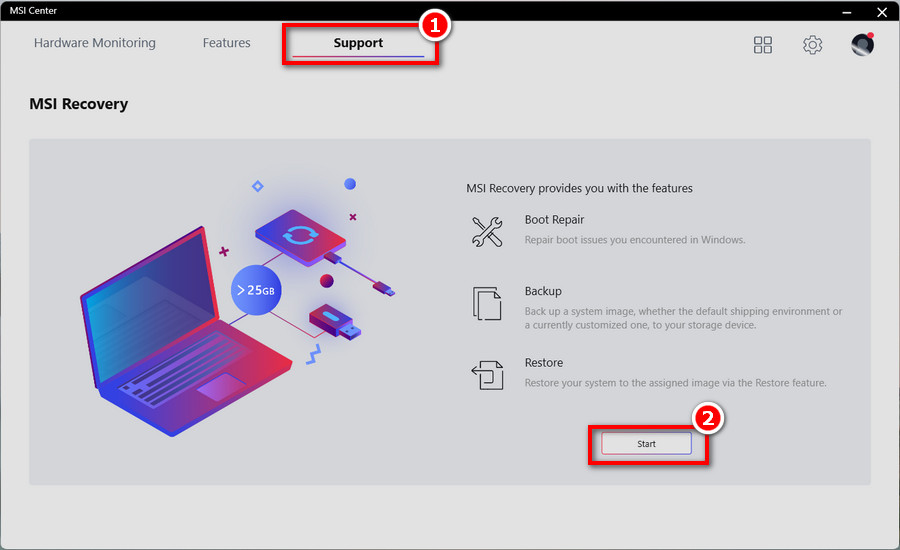
1. Enter MSI Center → Support → MSI Recovery
2. Click “Start”
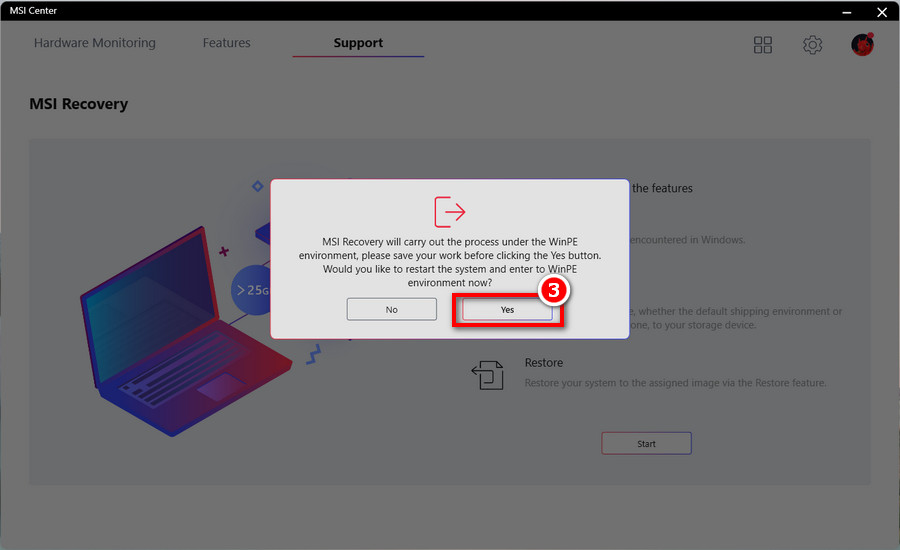
3. Click “Yes” to restart the system and enter WinPE mode
MSI Dragon Center/ MSI Creator Center
Enter MSI Dragon Center / MSI Creator Center → Backup
- Creating a system restoration disk
- Creating a new restoration ISO file
- Confirm that the system backup file has been generated correctly
- Executing system restoration through restoring a backup
Creating a system restoration disk
Before executing:
- Use a USB flash drive that is 32GB or larger to create your restoration flash drive.
- During the system restoration process, please keep the power cable connected at all times.
- Do not move or delete any system files or clear the system drive.
- Please read this article thoroughly before starting the backup.
1. Select “USB” and then follow the instructions on the screen

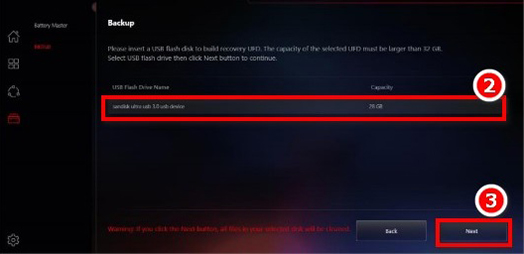
2. Insert a USB flash drive with sufficient capacity
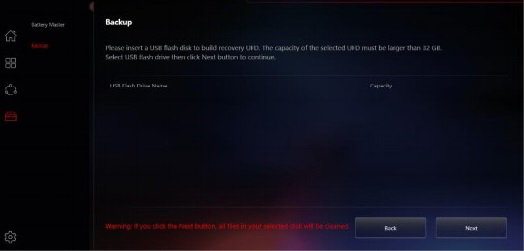
3. After selecting the path of the inserted USB flash drive, select “Next”
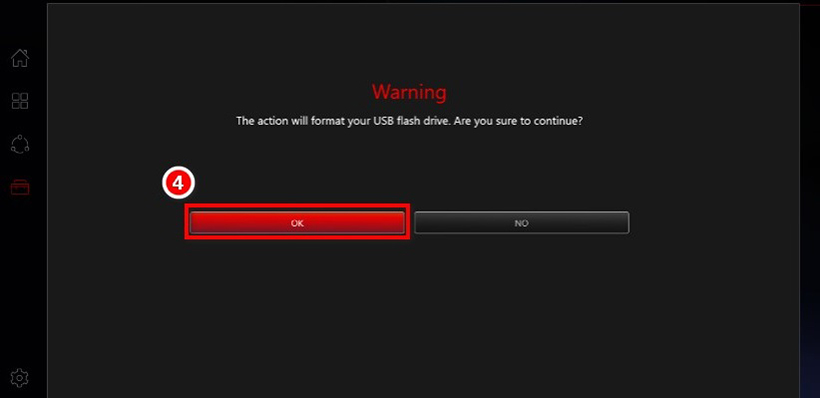
4. Click “OK” to format the flash drive and continue
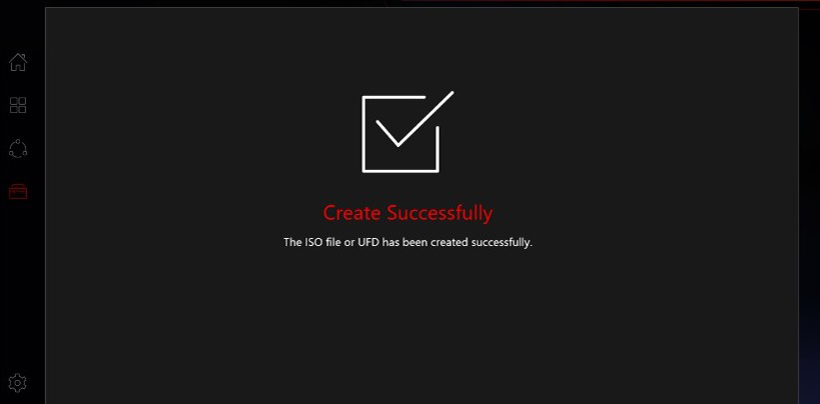
5. The creation of the restoration flash drive has been completed
Creating a new restoration ISO file
ISO file can create a restoration disk by using burning software.
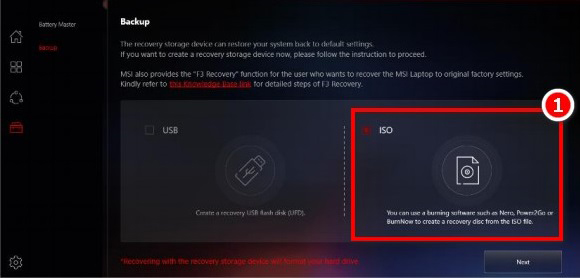
1. Select “ISO” and then follow the instructions on the screen
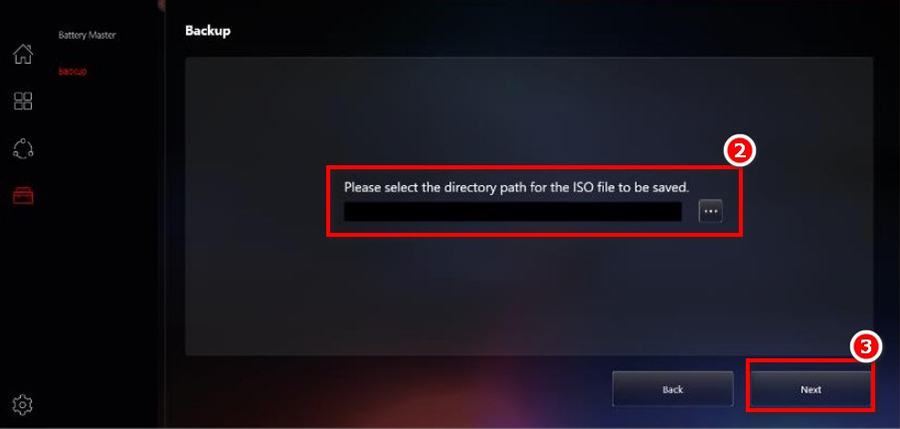
2. Select the storage path of the ISO file and then select “Next”
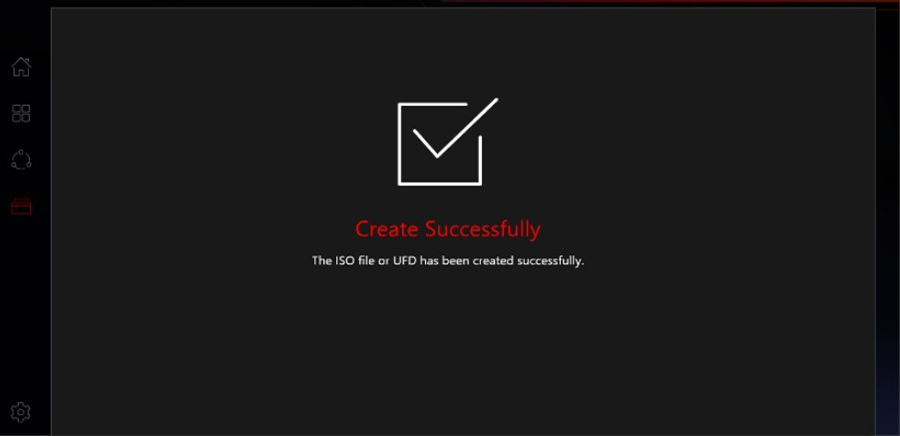
3. The creation of the restoration ISO file has been completed; a restoration disc can be created using burning software
Confirm that the system backup file has been generated correctly
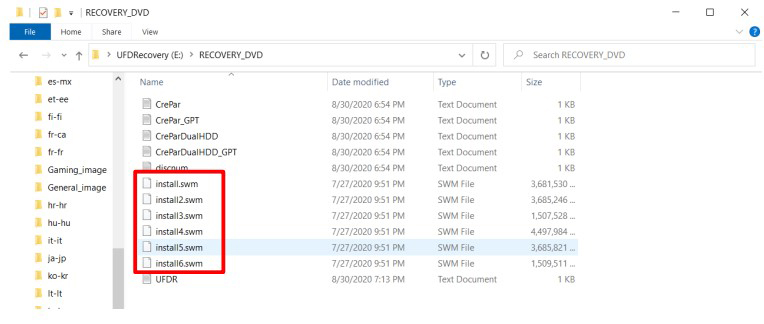
Please go to the “UFDRecovery disk\RECOVERY_DVD” folder to confirm whether the “swm” file was generated correctly in the order of “install.swm”, “install02.swm”, “install03.swm”, etc. If any is missing, please refer to this article to reinstall the latest version of MSI Dragon Center/ Creator Center, and then recreate the system restoration disk.
Successful:
Failed:
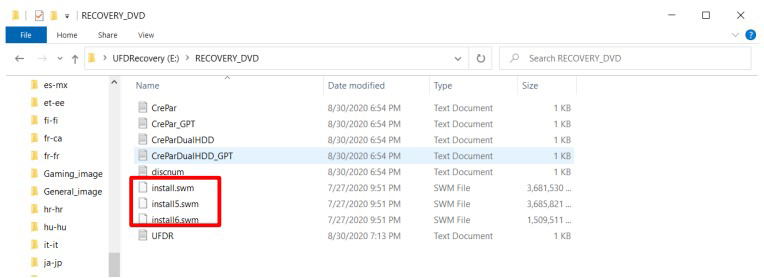
Note: The number of “install.swm” files will differ according to the size of the system restoration file
Executing system restoration through restoring a backup
1. Insert the DVD restoration disc or USB restoration flash drive into the computer
2. Restart the computer
3. Press the “F11” hotkey during the computer’s restarting process
4. Select boot from “DVD Recovery disk” or “USB flash drive”, press “Enter” to confirm, and then follow the instructions on the screen
5. The restoration main menu will be displayed
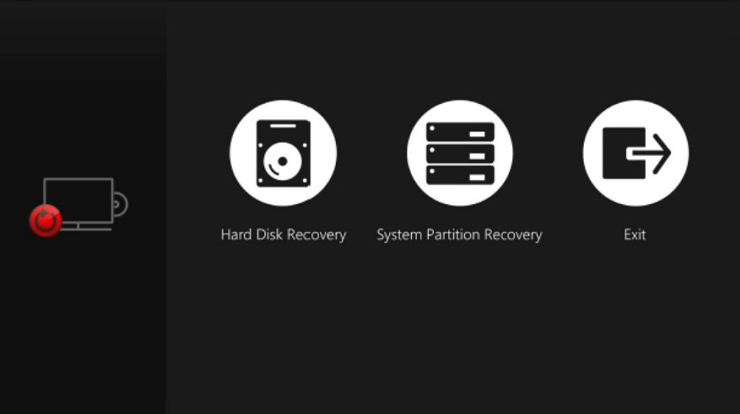
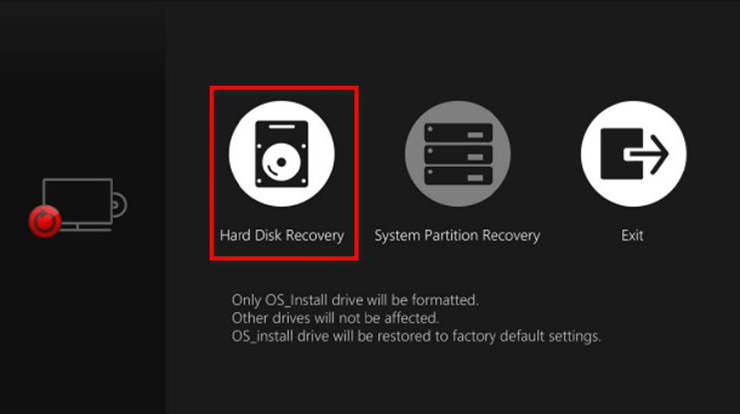
6. Select “Hard Disk Recovery” to restore the hard drive to its default factory status
7. Select “System Partition Recovery” to only reset the system drive to its default factory values

8. Adapter power is required when executing the system restoration function. Make sure to connect the adapter power to the notebook computer before executing the next step
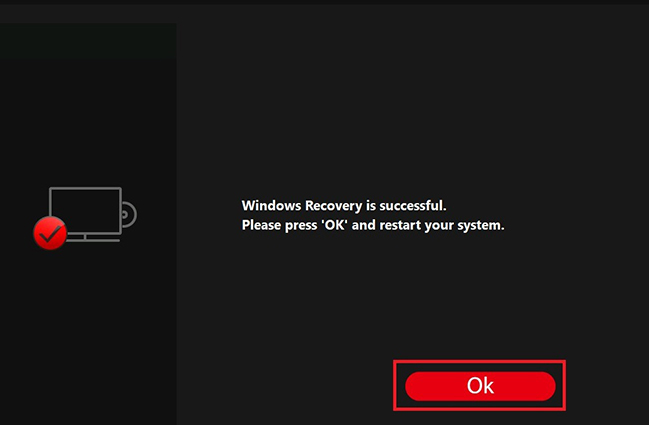
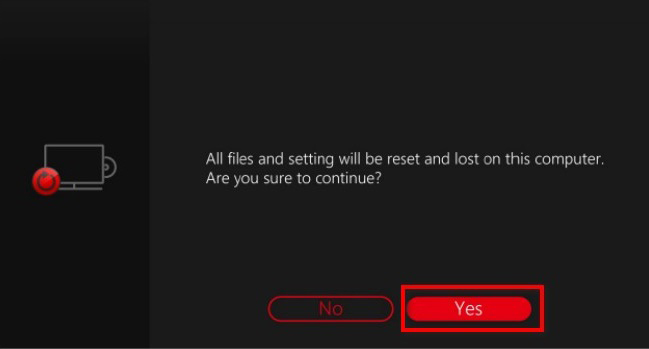
9. Select “Yes”. The system restoration operation will reformat the hard disk. Make sure to back up the important data before executing the next step
10. System restoration completed