How to Install the Cables for the MPG CORELIQUID K Series
Case & Components
MSI recently released its latest liquid cooler product, the MPG CORELIQUID K Series. Aimed to provide the most direct and complete user experience, the MPG CORELIQUID K Series is loaded with several unique features that can be used in conjunction with the MSI Center.
The purpose of this blog is to demonstrate how to correctly connect all of the cables coming out of the MPG CORELIQUID K Series water block.
The purpose of this blog is to demonstrate how to correctly connect all of the cables coming out of the MPG CORELIQUID K Series water block.
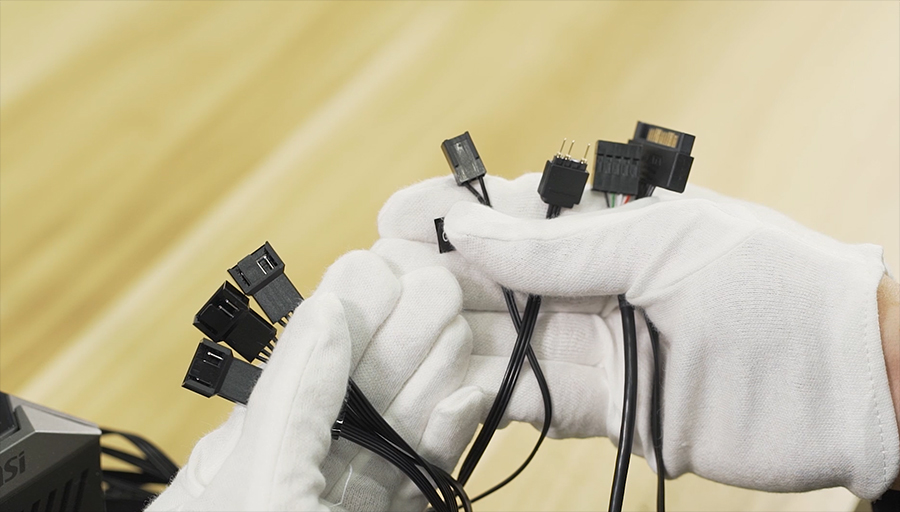 |
There are a total of 7 cables, and from left to right the cables are: 3 fan cables, 1 CPU fan cable, 1 ARGB cable, 1 JUSB cable, and 1 SATA cable.
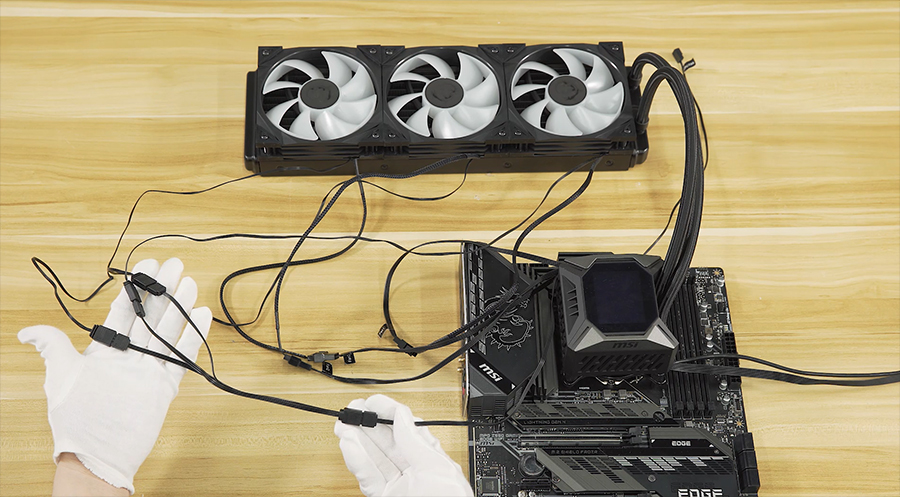
Connect the 3 fan cables to their respective fans.
 |
From the water block, three cables should be connected to the radiator fans. They are labeled as Fan 1, Fan 2, and Fan 3. It is important to note that whichever fan you connect to with the Fan 1 cable, that fan will be recognized as the Fan 1 in the MSI Center regardless of the order. We suggest you connect the fan closest to the water pipes as Fan 1 and followed by Fan 2 and Fan 3 in that order.
CPU Fan Cable.
 |
What sets the MPG CORELIQUID K Series apart from most other liquid coolers is the water block fan. Cleverly placed and hidden inside the water block is a 60mm TORX FAN 3.0 designed to provide cooling to the power solutions. It can also have its speed automatically adjusted with G.I. (Gaming Intelligence) Mode through the MSI Center depending on the CPU temperature. To have all of these features work properly, you need to connect the cable labeled with the CPU fan to the CPU Fan1 header on the motherboard.
*Note that to use the MSI Center, you need to be using the Intel 500 Series motherboards. Otherwise, please use the Dragon Center along with the CORELIQUID APP.*
*Note that to use the MSI Center, you need to be using the Intel 500 Series motherboards. Otherwise, please use the Dragon Center along with the CORELIQUID APP.*
ARGB Lighting Cable.
 |
There’s an ARGB splitter cable that came with the packaging as an accessory. On the splitter end, connect all of the radiator fans’ ARGB cables to it. On the other end with a single cable, connect it to the ARGB cable coming out of the water block.
JUSB Cable.
 |
This is the JUSB cable, and it needs to be plugged onto the motherboard. Identify the JUSB1 header on the motherboard, and connect the JUSB cable to the JUSB1 header. The purpose of the JUSB cable is to connect the liquid cooler to the motherboard for information transmission.
SATA Power Cable.
 |
The SATA power cable needs to be connected to provide power to the liquid cooler. Plugin the power supply’s SATA cable first, then connect the power supply’s SATA cable to the liquid cooler’s SATA cable.
The MPG CORELIQUID K Series is a liquid cooler that excels in performance, looks, and software compatibility. It is also designed for the most complete user experience through integration with the all-new MSI Center. To achieve everything listed above, the water block of the MPG CORELIQUID K Series and its cables may seem like a handful. With this blog, we hope that you can easily navigate the complexities and easily enjoy your next game.
The MPG CORELIQUID K Series is a liquid cooler that excels in performance, looks, and software compatibility. It is also designed for the most complete user experience through integration with the all-new MSI Center. To achieve everything listed above, the water block of the MPG CORELIQUID K Series and its cables may seem like a handful. With this blog, we hope that you can easily navigate the complexities and easily enjoy your next game.
To see the cable installation video guide of the MPG CORELIQUID K Series:
For more information about the MPG CORELIQUID K Series:
https://www.msi.com/Liquid-Cooling/MPG-CORELIQUID-K360
https://www.msi.com/Liquid-Cooling/MPG-CORELIQUID-K240
For more information about the MPG CORELIQUID K Series:
https://www.msi.com/Liquid-Cooling/MPG-CORELIQUID-K360
https://www.msi.com/Liquid-Cooling/MPG-CORELIQUID-K240


